Vue Vue是一款用于构建用户界面的JavaScript框架(==渐进式框架==)。它基于标准HTML、CSS和JavaScript构建,并提供了一套声明式的、组件化的编程模型,帮助高效地开发用户界面。根据需求场景,可以用不同的方式使用Vue:
无需构建步骤,渐进式增强静态地HTML
在任何页面中作为 Web Components 嵌入
单页应用(SPA)
全栈 / 服务端渲染 (SSR)
Jamstack / 静态站点生成 (SSG)
开发桌面端、移动端、WebGL、甚至是命令行终端中地界面
官方文档
地址
Vue API风格
Vue的组件可以按照两种不同的风格书写:==选项式 API (Vue2)==和==组合式 API(Vue3)==
大部分的核心概念在这两种风格之间都是通用的
选项式 API (Options API)
使用选项式 API,我们可以使用包含多个选项的对象来描述组件的逻辑,例如data、methods、mounted。选项所定义的属性都会暴露在函数内部的this上,它会指向当前的组件实例
1
2
3
4
5
6
7
8
9
10
11
12
13
14
15
16
17
18
19
20
21
<script> export defalut { data() { return { count: 0 } }, methods() { increment() { this.count++ } }, mounted() { console.log(`The initial count is ${this.count}.`) } } </script> <template> <button @click="increment">Count is: {{ count }} </button> </template>
组合式 API (Composition API)
通过组合式 API,我们可以使用导入的 API 函数来描述组件逻辑。
1
2
3
4
5
6
7
8
9
10
11
12
13
14
<script> import { ref, onMounted } from 'vue' const count = ref(0) function increment() { count.value++ } onMounted(()=> { console.log(`The initial count is ${this.count}.`) }) </script> <template> <button @click="increment">Count is: {{ count }} </button> </template>
两种 API 风格都能够覆盖大部分的应用场景。它们只是同一个底层系统所提供的两套不同的接口。实际上,选项式 API 是在组合式 API 的基础上实现的!关于 Vue 的基础概念和知识在它们之间都是通用的。
在生产项目中,当不需要使用构建工具,或者打算主要在低复杂度的场景使用 Vue,例如渐进式增强的应用场景,推荐采用选项式 API,当打算用 Vue 构建完整的单页应用,推荐采用组合式 API + 单文件组件
Vue 开发前的准备
构建工具让我们能够使用 Vue 单文件组件(SFC)。Vue 官方的构建流程是基于 Vite 的,一个现代、轻量、极速的构建工具。
前提条件
熟悉命令行
已安装 15.0 或更高版本的 Node.js
创建 Vue 项目
这一指令将会安装并执行create-vue,它是 Vue 官方的项目脚手架工具。
==注意的是,创建 Vue 项目时,尽量项目名称不要字母大写==
如果不确定是否要开启某个功能,可以直接选择按下回车键选择No。在项目被创建后,通过以下步骤安装依赖并启动开发服务器
1
2
3
cd 创建的Vue项目名称 npm install npm run dev
开发环境
推荐的 IDE 配置是 Visual Studio Code + Volar 扩展
Vue 项目目录结构
1
2
3
4
5
6
7
8
9
.vscode ---VSCode工具的配置文件 node_modules ---Vue项目的运行依赖文件夹 public ---资源文件夹(浏览器图标) src ---源码文件夹 .gitignore ---git忽略文件 index.html ---入口HTML文件 package.json ---信息描述文件 README.md ---注释文件 vite.config.js ---Vue配置文件
模板语法 Vue 使用一种基于 HTML 的模板语法,使我们能够声明式地将其组件实例地数据绑定到呈现的 DOM 上。所有的 Vue 模板语法都是语法层面合法的浏览器和 HTML 解析器解析。
文本插值 最基本的数据绑定形式是文本插值,它使用的是Mustache语法(即双大括号)
1
2
3
4
5
6
7
8
9
10
11
12
13
<template> <h3>模板语法</h3> <p>{{ msg }}</p> </template> <script> export default { data() { return { msg: '神奇的语法' } } } </script>
使用 JavaScript 表达式 每个绑定仅支持==单一表达式==,也就是一段能够被求值的 JavaScript 代码。一个简单的判断方法是是否可以合法地写在return 后面
1
2
3
4
5
6
7
8
9
10
11
12
13
14
15
16
17
18
19
20
<template> <h3>模板语法</h3> <p>{{ msg }}</p> <p>{{num + 1 }}</p> <p>{{ ok ? 'yes' : 'no' }}</p> <p>{{ message.split(' ').reverse().join(' ') }}</p> </template> <script> export default { data() { return { msg: '神奇的语法', num: 10, ok: true, message: '大家好' } } } </script>
无效 1 2 3 4 <!-- 这是一个语句,而非表达式 --> {{ var a = 1 }} <!-- 条件控制也不支持,请使用三元表达式 --> {{ if (ok) { return message } }}
原始 HTML 双大括号将会将数据插值为纯文本,而不是 HTML。若想要插入 HTML ,需要使用 v-html指令
1 2 3 4 5 6 7 8 9 10 11 12 13 14 15 16 17 18 19 20 21 22 <template> <h3>模板语法</h3> <p>{{ msg }}</p> <p>{{num + 1 }}</p> <p>{{ ok ? 'yes' : 'no' }}</p> <p>{{ message.split(' ').reverse().join(' ') }}</p> <p v-html="rawHtml"></p> </template> <script> export default { data() { return { msg: '神奇的语法', num: 10, ok: true, message: '大家好', rawHtml: '<a href="https://itbaizhan.com">百战程序员</a>' } } } </script>
模板引用 虽然 vue 的声明性渲染模型抽象了大部分对 DOM 的直接操作,但在某些情况下,我们仍然需要直接访问底层 DOM 对象。要实现这一点,我们可以使用特殊的 ref attribute
挂载结束后引用都会被暴露在this.$refs上
1 2 3 4 5 6 7 8 9 10 11 12 13 14 15 16 17 18 19 20 21 22 23 24 25 26 27 28 <template> <div ref="container" class="container">{{ content }}</div> <button @click="getElement">获取元素</button> <input type="text" ref="username"> </template> <script> // 内容改变: {{ 模板语法 }} // 属性改变:v-bind:指令 // 事件:v-on:click // 如果没有特别的需求,不要操作 DOM export default{ data() { return { content: "内容" } }, methods: { getElement() { // innerHTML: 原生JS属性 console.log(this.$refs.container) this.$refs.container.innerHTML = "哈哈哈" console.log(this.$refs.username.value) } } } </script>
属性绑定 双大括号不能在 HTML attributes 中使用。想要响应式地绑定一个 attribute,应该使用v-bind指令
1 2 3 4 5 6 7 8 9 10 11 12 13 14 15 16 17 18 19 20 21 <template> <div v-bind:class="msg" v-bind:id="dynamicId">测试</div> </template> <script> export default { data() { return { msg: 'appClass', dynamicId:'appID' } } } </script> <style> .appClass { color: red; font-size: 20px; } </style>
v-bind指令指示 Vue 将元素的id attribute 与组件的 dynamicId属性保持一致,如果绑定的是null或者undefined,那么该 attribute 将会从渲染的元素上移除
简写(由于v-bind非常常用,因此提供了特定的简写语法)
1 <div :id="dynamicId" :class="msg"></div>
布尔型 Attribute 布尔型 Attribute 依据 true / false 值来决定 attribute 是否应该存在于该元素上,disabled就是最常见的例子之一
1 2 3 4 5 6 7 8 9 10 11 12 13 14 <template> <button :disabled="isButtonDisabled"> BUtton </button> </template> <script> export defalut { data() { return { isButtonDisabled: true } } } </script>
动态绑定多个值 使用一个包含多个 attribute 的 JavaScript 对象
1 2 3 4 5 6 7 8 9 10 11 12 13 14 15 16 17 <template> <div v-bind="objectOfattrs"> 百战程序员 </div> </template> <script> export defalut { data() { return { objectOfattrs: { id: 'container', class: 'wrapper' } } } } </script>
条件渲染 在 Vue中,提供了条件渲染,这类似于JavaScript中的条件语句
v-if
v-if指令用于条件性地渲染一块内容。这块内容只会在表达式返回真值时才被渲染
1 2 3 4 5 6 7 8 9 10 11 12 13 <template> <h3>条件渲染</h3> <div v-if="flag">你能看见我吗?</div> </template> <script> export default { data() { return { flag: true } } } </script>
v-else
可以使用v-else为v-if添加一个“ else 区域”
1 2 3 4 5 6 7 8 9 10 11 12 13 14 <template> <h3>条件渲染</h3> <div v-if="flag">你能看见我吗?</div> <div v-else>你还能看见我吗?</div> </template> <script> export default { data() { return { flag: true } } } </script>
v-else-if
v-else-if提供的是相应于v-if的else if区块,它可以连续多次重复使用
1 2 3 4 5 6 7 8 9 10 11 12 13 14 15 16 17 18 19 <template> <h3>条件渲染</h3> <div v-if="flag">你能看见我吗?</div> <div v-else>你还能看见我吗?</div> <div v-if="type === 'A'">A</div> <div v-else-if="type === 'B'">B</div> <div v-else-if="type === 'C'">C</div> <div v-else>Not A B C</div> </template> <script> export default { data() { return { flag: true, type: "D" } } } </script>
v-show
v-show也可以按照条件显示一个元素,其用法基本一样
1 2 3 4 5 6 7 8 9 10 11 12 13 <template> <h3>条件渲染</h3> <div v-show="flag">你能看见我吗?</div> </template> <script> export default { data() { return { flag: true } } } </script>
v-if与v-show的区别
v-if是真实的按照条件渲染,因为它确保了在切换时,条件区块内的事件监听器和子组件都会被销毁与重建。同时它也是惰性的,如果在初次渲染时条件值为false,则不会做任何事件。条件区块只有当条件首次变为true时才被渲染。v-show则简单许多,无论元素初始条件如何,始终会被渲染,只有 CSS display属性会被切换。总的而言,v-if有更高的切换开销,而v-show有更高的初始渲染开销。因此,1如果需要频繁切换,则使用v-show比较好;如果在运行时绑定条件很少改变,则v-if更加合适
列表渲染 可以使用v-for指令基于一个数组来渲染一个列表,v-for指令的值需要item in items形式的特殊语法,其中item是源数据的数组,而item是迭代项的别名
1 2 3 4 5 6 7 8 9 10 11 12 13 14 <template> <h3>列表渲染</h3> <p v-for="item in msg">{{ item }}</p> </template> <script> export default { data() { return { msg: ['中国','美国','日本','韩国'] } } } </script>
复杂数据
大多数情况下,我们渲染的数据来源于网络请求,也就是 JSON 格式
1 2 3 4 5 6 7 8 9 10 11 12 13 14 15 16 17 18 19 20 21 22 23 24 25 26 27 28 29 30 31 32 33 34 35 <template> <h3>列表渲染</h3> <p v-for="item in msg">{{ item }}</p> <div v-for="item in result"> <p>{{ item.title }}</p> <img :src="item.avator" alt=""> </div> </template> <script> export default { data() { return { msg: ['中国','美国','日本','韩国'], result: [ { "id": 2261677, "title": "题目1", "avator": "https://pic.qyer.com/avatar/002/25/77/30/200?v=1560226451", }, { "id": 2261656, "title": "题目2", "avator": "https://pic.qyer.com/avatar/011/07/08/69/200?v=1572185180", }, { "id": 2261672, "title": "题目3", "avator": "https://pic.qyer.com/avatar/009/88/48/58/200?v=1507386782", }, ] } } } </script>
v-for也支持使用可选的第二个参数表示当前项的位置索引
1 2 3 4 5 6 7 8 9 10 11 12 13 14 <template> <h3>列表渲染</h3> <p v-for="(item,index) in msg">{{ index }}-{{ item }}</p> </template> <script> export default { data() { return { msg: ['中国','美国','日本','韩国'], } } } </script>
也可以使用of来代替in,这更接近 JavaScript 的迭代器语法
1 2 <div v-for="item of items"> </div>
v-for与对象
也可以通过使用v-for来遍历一个对象的所有属性
1 2 3 4 5 6 7 8 9 10 11 12 13 14 15 16 17 18 19 20 21 22 <template> <h3>列表渲染</h3> <p v-for="(item,index) in msg">{{ index }}-{{ item }}</p> <div> <p v-for="(value,key,index) of userInfo">{{ value}} - {{ key }} - {{ index }}</p> </div> </template> <script> export default { data() { return { msg: ['中国','美国','日本','韩国'], userInfo: { name: '张三', age: 20, sex: "男" } } } } </script>
通过key管理状态
1 2 3 4 5 6 7 8 9 10 11 12 13 14 15 16 <template> <h3> Key属性添加到V-for中 </h3> <p v-for="(item,index) of msg" :key="index">{{ item }}</p> </template> <script> export default { data() { return { msg: ['第一','第二','第三'] } } } </script>
温馨提示
key在这里是一个通过v-bind绑定的特殊 attribute
推荐在任何可行的时候为v-for提供一个keyattribute
key绑定的值期望是一个基础类型的值,例如字符串或者 number 类型
key的来源
请不要使用index作为key的值,我们要确保每一条数据的唯一索引不会发生变化
1 2 3 4 5 6 7 8 9 10 11 12 13 14 15 16 17 18 19 20 21 22 23 24 25 26 27 28 29 30 31 32 33 34 35 <template> <h3>列表渲染</h3> <p v-for="item in msg">{{ item }}</p> <div v-for="item in result" :key="item.id"> <p>{{ item.title }}</p> <img :src="item.avator" alt=""> </div> </template> <script> export default { data() { return { msg: ['中国','美国','日本','韩国'], result: [ { "id": 2261677, "title": "题目1", "avator": "https://pic.qyer.com/avatar/002/25/77/30/200?v=1560226451", }, { "id": 2261656, "title": "题目2", "avator": "https://pic.qyer.com/avatar/011/07/08/69/200?v=1572185180", }, { "id": 2261672, "title": "题目3", "avator": "https://pic.qyer.com/avatar/009/88/48/58/200?v=1507386782", }, ] } } } </script>
事件处理 我们可以使用v-on指令(简写为@)来监听 DOM 事件,并在事件触发时执行相对应的 JavaScript。用法:v-on:click="methodName"或@click=handler
事件处理器的值可以是
内联事件处理器:事件被触发执行时执行的内联 JavaScript语句(与onclick类似)
方法事件处理器:一个指向组件上定义的方法的属性名或是路径
内联事件处理器 内联事件处理器通常用于简单场景
1 2 3 4 5 6 7 8 9 10 11 12 13 14 15 16 17 18 19 <template> <h3>内联事件处理器</h3> <button @click="count++"> Add 1 </button> <p> {{ count }} </p> </template> <script> export defau1t { darta() { return { count: 0 } } } </script>
方法事件处理器 1 2 3 4 5 6 7 8 9 10 11 12 13 14 15 16 17 18 19 20 21 22 <template> <h3>方法事件处理器</h3> <button v-on:click="addCount"> Add </button> <div>{{ count }}</div> </template> <script> export default { data() { return { count:0 } }, methods: { addCount() { this.count++ } } } </script>
事件参数 事件参数可以通过event对象和通过事件传递数据
获取event对象
1 2 3 4 5 6 7 8 9 10 11 12 13 14 15 16 17 18 19 20 21 22 23 24 <template> <h3>方法事件处理器</h3> <button v-on:click="addCount"> Add </button> <div>{{ count }}</div> </template> <script> export default { data() { return { count:0 } }, methods: { addCount(e) { // vue 中的event对象,就是原生js的对象 console.log(e.target) this.count++ } } } </script>
传递参数并获取event对象
1
2
3
4
5
6
7
8
9
10
11
12
13
14
15
16
17
18
19
<template> <h3>事件传参</h3> <p @click="getname(item,$event)" v-for="(item,index) of names" :key="index">{{ item }}</p> </template> <script> export default { data() { return { names: ["1","2","3"] } }, methods: { getname(name,e) { console.log(name,e) } } } </script>
事件修饰符 在处理事件时调用event.preventDefault()或event.stopPropagation()是很常见的。尽管我们可以直接在方法内调用,但如果方法能更专注于数据逻辑而不用去处理 DOM 事件的细节会更好,为了解决这一问题, Vue 为v-on提供了事件修饰符,常用的有以下几个:
.stop.prevent.once.enter
具体参考
https://cn.vuejs.org
阻止默认事件 1 2 3 4 5 6 7 8 9 10 11 12 13 14 15 16 17 18 19 20 21 <template> <H3>事件修饰符</H3> <a @click.prevent="clickHandler" href="https://itbaizhan.com">百战程序员</a> </template> <script> export default { data() { return { } }, methods: { clickHandler(e) { //阻止默认事件 // e.preventDefault(); console.log('点击了') } } } </script>
阻止事件冒泡 1 2 3 4 5 6 7 8 9 10 11 12 13 14 15 16 17 18 19 20 21 22 23 24 25 26 27 28 29 30 31 32 <template> <h3>事件修饰符</h3> <a @click.prevent="clickHandler" href="https://itbaizhan.com">百战程序员</a> <div @click="clickDiv"> <p @click.stop="clickP">测试冒泡</p> </div> </template> <script> export default { data() { return { } }, methods: { clickHandler(e) { //阻止默认事件 // e.preventDefault(); console.log('点击了') }, clickDiv() { console.log('DIV') }, clickP(e) { //阻止事件冒泡 // e.stopPropagation() console.log('P') } } } </script>
数组变化侦测 变更方法
Vue 能够侦听响应式数据的变更方法,并在它们被调用时触发相关的更新。这些变更方法包括:
push()
pop()
shift()
unshift()
splice()
sort()
reverse()
1 2 3 4 5 6 7 8 9 10 11 12 13 14 15 16 17 18 19 20 21 22 23 24 25 26 <template> <h3>数组变化侦测</h3> <button @click="addList">添加数据</button> <ul> <li v-for="(item,index) of names" :key="index">{{ item }}</li> </ul> </template> <script> export default { data() { return { names: ['一号','二号','三号','四号'] } }, methods: { addList() { //引起 UI 自动更新 // this.names.push("五号") //不会引起 UI 自动更新 this.names.concat("[五号]") console.log(this.names) } } } </script>
替换一个数组
变更方法,顾名思义,就是会对调用它们的原数组进行变更,相对地,也有一些不可变的方法,例如filter()
,concat(),slice(),这些都不会更改原数组,而总是返回一个新数组 。当遇到的是非变更方法时,我们需要将旧的数组替换为新的
1 2 3 4 5 6 7 8 9 10 11 12 13 14 15 16 17 18 19 20 21 22 23 24 25 26 27 28 29 30 31 32 33 34 35 36 <template> <h3>数组变化侦测</h3> <button @click="addList">添加数据</button> <ul> <li v-for="(item,index) of names" :key="index">{{ item }}</li> </ul> <button @click="concatArray">合并数组</button> <h3>数组1</h3> <p v-for="(item,index) of nums1" :key="index">{{ item }}</p> <h3>数组2</h3> <p v-for="(item,index) of nums2" :key="index">{{ item }}</p> </template> <script> export default { data() { return { names: ['一号','二号','三号','四号'], nums1: [1,2,3,4,5], nums2: [6,7,8,9,10] } }, methods: { addList() { //引起 UI 自动更新 // this.names.push("五号") //不会引起 UI 自动更新 this.names.concat("[五号]") console.log(this.names) }, concatArray() { this.nums1 = this.nums1.concat(this.nums2) } } } </script>
计算属性 模板中的表达式虽然方便,但也只能用来做简单的操作,如果在模板中写太多逻辑,会让模板变得臃肿,难以维护。因此我们推荐使用计算属性 来描述依赖响应式状态的复杂逻辑
1 2 3 4 5 6 7 8 9 10 11 12 13 14 15 16 17 18 19 20 21 22 23 24 <template> <h3>计算属性</h3> <p>{{ getResult }}</p> </template> <script> export default { data() { return { user: { name: "xiaobai", content: ['前端','Java','Python'] } } }, //计算属性 computed: { getResult(){ return this.user.content.length > 0 ? "YES" : "NO" } } } </script>
计算属性 VS 方法
重点区别:
计算属性:计算属性值会基于其响应式依赖被缓存。一个计算属性仅在其响应式依赖更新时才重新计算
方法:方法调用总是在重渲染发生时再次执行函数
Class 与 Style 绑定 数据绑定的一个常见需求场景是操纵元素的 CSS class 列表和内联样式。因为 class 和 style 都是 attribute,我们可以和其他 attribute 一样使用 v-bind 将它们和动态的字符串绑定。但是,在处理比较复杂的绑定时,通过拼接生成字符串是麻烦且易出错的。因此,Vue 专门为 class 和 style 的 v-bind 用法提供了特殊的功能增强。除了字符串外,表达式的值也可以是对象或数组。
Class 绑定 绑定对象 1 2 3 4 5 6 7 8 9 10 11 12 13 14 15 16 17 18 19 20 <template> <h3>Class 样式绑定</h3> <div class="static" :class="{ 'active': isActive, 'text-danger': hasError }"> 显示</div> </template> <script> export default { data() { return { isActive: true, hasError: false } } } </script> <style> .active { color: red; font-size: 30px; } </style>
多个对象绑定 1 2 3 4 5 6 7 8 9 10 11 12 13 14 15 16 17 18 19 20 21 22 <template> <h3>Class 样式绑定</h3> <div :class="classObject"> 显示2</div> </template> <script> export default { data() { return { classObject: { 'active': true, 'text-danger': true } } } } </script> <style> .active { color: red; font-size: 30px; } </style>
绑定数组 1 2 3 4 5 6 7 8 9 10 11 12 13 14 15 16 17 18 19 20 21 22 23 24 25 26 27 28 29 <template> <h3>Class 样式绑定对象</h3> <div :class="{ 'active': isActive, 'text-danger': hasError }"> 显示</div> <div :class="classObject"> 显示2</div> <h3>Class 样式绑定数组</h3> <div :class="[activeClass, errorClass]">显示3</div> </template> <script> export default { data() { return { isActive: true, hasError: false, classObject: { 'active': true, 'text-danger': true }, activeClass: "active", errorClass: "danger" } } } </script> <style> .active { color: red; font-size: 30px; } </style>
使用三元表达式有条件渲染某个 class
1 2 3 4 5 6 7 8 9 10 11 12 13 14 15 16 17 18 19 20 21 22 23 24 25 26 27 28 29 30 31 <template> <h3>Class 样式绑定对象</h3> <div :class="{ 'active': isActive, 'text-danger': hasError }"> 显示1</div> <div :class="classObject"> 显示2</div> <h3>Class 样式绑定数组</h3> <div :class="[activeClass, errorClass]">显示3</div> <h3>Class 样式三元表达式绑定</h3> <div :class="[isActive ? 'active' : 'text-danger']">显示4</div> </template> <script> export default { data() { return { isActive: true, hasError: false, classObject: { 'active': true, 'text-danger': true }, activeClass: "active", errorClass: "danger" } } } </script> <style> .active { color: red; font-size: 30px; } </style>
数组和对象 1 2 3 4 5 6 7 8 9 10 11 12 13 14 15 16 <template> <div :class="[{'active':isActive},errorClass]"> </div> </template> <script> export default { data() { return { isActive: true, errorClass: "text-danger" } } } </script>
温馨提示
数组和对象嵌套过程中,只能是数组嵌套对象,不能反其道而行
Style 绑定 绑定对象 1 2 3 4 5 6 7 8 9 10 11 12 13 14 15 16 17 18 19 <template> <p :style="{ color: activeColor, fontSize: fontSize + 'px' }">Style 绑定1</p> <p :style="styleObject">Style 绑定2</p> </template> <script> export default { data() { return { activeColor: 'red', fontSize: 30, styleObject: { color: 'green', fontSize: '40px' } } } } </script>
侦听器 我们可以使用watch选项在每次响应式属性发生变化时触发一个函数
1 2 3 4 5 6 7 8 9 10 11 12 13 14 15 16 17 18 19 20 21 22 23 24 25 26 27 28 29 <template> <h3>侦听器</h3> <p >{{ msg }}</p> <button @click="updateMsg">修改数据</button> </template> <script> export default { data() { return { msg: 'Hello' } }, methods: { updateMsg() { this.msg = 'World' } }, watch: { //newValue: 改变之后的数据 //oldValue: 改变之前的数据 //函数名必须与侦听的数据对象保持一致 msg(newValue,oldValue) { //数据发生变化时自动执行的函数 console.log(newValue,oldValue) } } } </script>
表单输入绑定 在前端处理表单时,我们常常需要将表单输入框的内容同步给 JavaScript 中相应的变量。手动连接值绑定和更改事件监听器可能会很麻烦,v-model指令帮我们简化了这一步骤
1 2 3 4 5 6 7 8 9 10 11 12 13 14 15 16 17 18 <template> <h3>表单输入绑定</h3> <form > <input type="text" v-model="message"> <p>{{ message }}</p> </form> </template> <script> export default { data() { return { message: "" } } } </script>
复选框
1 2 3 4 5 6 7 8 9 10 11 12 13 14 15 16 17 18 19 20 21 <template> <h3>表单输入绑定</h3> <form > <input type="text" v-model="message"> <p>{{ message }}</p> <input type="checkbox" id="checkbox" v-model="checked" /> <label for="checkbox">{{ checked }}</label> </form> </template> <script> export default { data() { return { message: "", checked: false } } } </script>
修饰符
v-model也提供了修饰符:.lazy、.number、.trim
.lazy
默认情况下,v-model 会在每次 input 事件后更新数据 (IME 拼字阶段的状态 例外)。可以添加 lazy 修饰符来改为在每次 change 事件后更新数据
1 2 3 4 5 6 7 8 9 10 11 12 13 14 15 16 17 18 <template> <h3>表单输入绑定</h3> <form > <input type="text" v-model.lazy="message"> <p>{{ message }}</p> </form> </template> <script> export default { data() { return { message: "" } } } </script>
组件 组件组成 组件最大的优势在于可复用性,当使用构建步骤时,我们一般会将 Vue 组件定义在一个单独的.vue文件中,这被叫做单文件组件(简称 SFC)
组件组成结构
1 2 3 4 5 6 7 8 9 10 11 <template> <div> 承载标签 </div> </template> <script> export default {} </script> <style scoped> <!-- scoped:让当前样式只在当前组件中生效 --> </style>
组件引用
1 2 3 4 5 6 7 8 9 10 11 <template> <TemplateDemo /> </template> <script> import TemplateDemo from './components/TemplateDemo.vue' export default { components: { TemplateDemo } } </script>
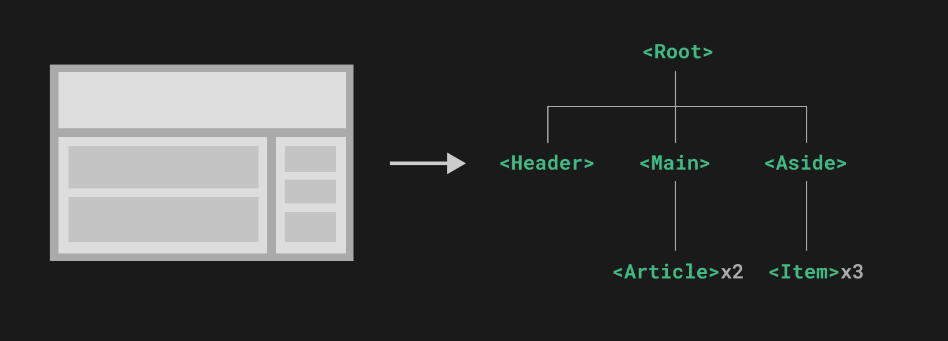
组件的嵌套关系 组件允许我们将 UI 划分为独立的、可重用的部分,并且可以对每个部分进行单独的思考。在实际应用中,组件常常被组织成层层嵌套的树状结构,Vue 实现了自己的组件模型,使得我们可以在每个组件内封装自定义内容与逻辑
创建组件及引用关系
Header
1 2 3 4 5 6 7 8 9 10 11 12 13 <template> <h3>Header</h3> </template> <style scoped> h3 { width: 100%; height: 100px; border: 5px solid #999; text-align: center; line-height: 100px; box-sizing: border-box; } </style>
Main
1 2 3 4 5 6 7 8 9 10 11 12 13 14 15 16 17 18 19 20 21 22 23 24 <template> <div class="main"> <h3>Main</h3> <Article /> <Article /> </div> </template> <script> import Article from './Article.vue' export default { components: { Article } } </script> <style scoped> .main { float: left; width: 70%; height: 400px; border: 5px solid #999; box-sizing: border-box; } </style>
Aside
1 2 3 4 5 6 7 8 9 10 11 12 13 14 15 16 17 18 19 20 21 22 23 24 25 26 <template> <div class="aside"> <h3>Aside</h3> <Item /> <Item /> <Item /> </div> </template> <script> import Item from './Item.vue' export default { components: { Item } } </script> <style scoped> .aside { float: right; width: 30%; height: 400px; border: 5px solid #999; box-sizing: border-box; } </style>
Article
1 2 3 4 5 6 7 8 9 10 11 12 13 14 15 <template> <h3>Article</h3> </template> <style scoped> h3 { width: 80%; margin: 0 auto; text-align: center; line-height: 100px; box-sizing: border-box; margin-top: 50px; background-color: #999; } </style>
Item
1 2 3 4 5 6 7 8 9 10 11 12 13 14 15 <template> <h3>Item</h3> </template> <style scoped> h3 { width: 80%; margin: 0 auto; text-align: center; line-height: 100px; box-sizing: border-box; margin-top: 10px; background-color: #999; } </style>
组件的组成方式 一个 Vue 组件在使用前需要先被注册,这样 Vue 才能在渲染模板时找到其对应的实现。组件注册有两种方式:全局注册和局部注册
全局注册
1 2 3 4 5 6 7 8 9 10 11 12 13 14 15 16 17 18 19 20 21 22 23 24 25 26 27 28 29 30 31 // main.js import { createApp } from 'vue' import App from './App.vue' import Header from './components/pages/Header.vue' const app = createApp(App) //在这中间写组件的注册 app.component("Header",Header) app.mount('#app') //APP.vue <script> // import Header from './components/pages/Header.vue' import Main from './components/pages/Main.vue' import Aside from './components/pages/Aside.vue'; export default { components: { // Header, Main, Aside } } </script> <template> <Header /> <Main /> <Aside /> </template>
局部注册
全局注册虽然方便,但有以下几个问题:
全局注册,但并没有被使用的组件无法在生产打包时被自动移除(也叫“tree-shaking”),如果全局注册了一个组件,即使它没有被实际使用,它仍然会出现在打包后的 JS 文件中
全局注册在大型项目中使项的依赖关系变得不那么明确,在父组件使用子组件时,不太容易定位子组件的实现。和使用过多的全局变量一样,这可能会影响应用的长期可维护性
局部注册需要使用components选项
1 2 3 4 5 6 7 8 9 10 11 <template> <TemplateDemo /> </template> <script> import TemplateDemo from './components/TemplateDemo.vue' export default { components: { TemplateDemo } } </script>
组件传递数据_Props 组件与组件之间不是完全独立的,而是有交集的,那就是组件与组件之间是可以传递数据的,传递数据的解决方案是props
1 2 3 4 5 6 7 8 9 10 11 12 13 14 15 16 17 18 <template> <h3>Parent</h3> <Child title="Parent 数据" Demo="测试数据"/> </template> <script> import Child from './Child.vue'; export default { data() { return { } }, components: { Child } } </script>
1 2 3 4 5 6 7 8 9 10 11 12 13 14 15 16 <template> <h3>Child</h3> <p>{{ title }}</p> <p>{{ Demo }}</p> </template> <script> export default { data() { return { } }, props: ["title","Demo"] } </script>
动态数据传递
1 2 3 4 5 6 7 8 9 10 11 12 13 14 15 16 17 18 19 <template> <h3>Parent</h3> <Child :title="msg1" :Demo="msg2"/> </template> <script> import Child from './Child.vue'; export default { data() { return { msg1: "Parent 数据", msg2: "测试数据" } }, components: { Child } } </script>
注意事项:
props传递数据,只能从父级传送到子级,不能反其道而行
组件传递多种数据类型 通过props传递数据,不仅可以传递字符串类型的数据,还可以是其他类型的数据,例如:数值、对象、数组等,但实际上任何类型的值都可以作为作为props的值被传递
Number
1 2 3 4 5 6 7 8 9 10 11 12 13 14 15 16 17 18 <template> <h3>Parent</h3> <Child :age="age" /> </template> <script> import Child from './Child.vue'; export default { data() { return { age: 18 } }, components: { Child } } </script>
1 2 3 4 5 6 7 8 9 10 11 12 13 14 15 <template> <h3>Child</h3> <p>{{ age }}</p> </template> <script> export default { data() { return { } }, props: ["age"] } </script>
Array
1 2 3 4 5 6 7 8 9 10 11 12 13 14 15 16 17 18 <template> <h3>Child</h3> <p>{{ age }}</p> <ul> <li v-for="(item,index) of names" :key="index">{{ item }}</li> </ul> </template> <script> export default { data() { return { } }, props: ["age","names"] } </script>
1 2 3 4 5 6 7 8 9 10 11 12 13 14 15 16 17 18 19 <template> <h3>Parent</h3> <Child :age="age" :names="names"/> </template> <script> import Child from './Child.vue'; export default { data() { return { age: 18, names: ["小白","小红","小黄"] } }, components: { Child } } </script>
Object
1 2 3 4 5 6 7 8 9 10 11 12 13 14 15 16 17 18 19 <template> <h3>Child</h3> <p>{{ age }}</p> <ul> <li v-for="(item,index) of names" :key="index">{{ item }}</li> </ul> <p>{{ object.age }} - {{ object.name }}</p> </template> <script> export default { data() { return { } }, props: ["age","names","object"] } </script>
1 2 3 4 5 6 7 8 9 10 11 12 13 14 15 16 17 18 19 20 21 22 23 <template> <h3>Parent</h3> <Child :age="age" :names="names" :object="object"/> </template> <script> import Child from './Child.vue'; export default { data() { return { age: 18, names: ["小白","小红","小黄"], object: { name: 'HNU', age: 18 } } }, components: { Child } } </script>
组件传递Props效验 Vue 组件可以更细致地声明对传入的props的校验要求
1 2 3 4 5 6 7 8 9 10 11 12 13 14 15 16 17 18 19 20 <template> <h1>componentA</h1> <componentB :title="title" :age="age" :names="names"/> </template> <script> import componentB from './componentB.vue' export default { data() { return { title: "标题", age: 20, names: ["A","B","C"] } }, components: { componentB } } </script>
1 2 3 4 5 6 7 8 9 10 11 12 13 14 15 16 17 18 19 20 21 22 23 24 25 26 27 28 29 30 31 32 33 <template> <h1>componentB</h1> <p>{{ title }}</p> <p>{{ age }}</p> <p v-for="(item,index) of names" :key="index">{{ item }}</p> </template> <script> export default { data() { return { } }, props: { title: { type: [String,Number,Object,Array], //类型限制 Required: true //必选项,必须传递 }, age: { type: Number, default: 0 // 数字和字符串可以直接 default,但是如果是数组和对象,必须通过工厂函数返回默认值 }, names: { type: Array, default() { return ["空"] } } } } </script>
温馨提示:
==prop 是只读的!==
即不能通过子级中的方法去修改父级传递给子级的数据
组件事件 在组件的模板表达式中,可以直接使用$emit方法触发自定义事件,触发自定义事件的目的是组件之间传递数据
1 2 3 4 5 6 7 8 9 10 11 12 13 14 15 16 17 18 19 20 21 22 23 24 25 26 <template> <h3>组件事件</h3> <Child @someEvent="getHandler"/> <p>{{ msg }}</p> </template> <script> import Child from './Child.vue'; export default { data() { return { msg: "" } }, components: { Child }, methods: { getHandler(data) { console.log("触发了",data) this.msg = data } } } </script>
1 2 3 4 5 6 7 8 9 10 11 12 13 14 15 16 17 18 19 20 <template> <h3>Child</h3> <button @click="sentData">传递数据</button> </template> <script> export default { data() { return { msg: "Child 数据" } }, methods: { sentData() { //自定义事件 this.$emit("someEvent",this.msg) } } } </script>
温馨提示
组件之间传递数据的方案:
父传子:props
子传父:自定义事件(this.$emit)
组件事件配合v-model使用 如果是用户输入,我们希望在获取数据的同时发送数据配合v-model来使用
1 2 3 4 5 6 7 8 9 10 11 12 13 14 15 16 17 18 19 20 21 22 23 ```vue <template> 搜索:<input type="text" v-model="search"> </template> <script> export default { data() { return { search: "" } }, // 侦听器 watch: { search(newValue,oldValue) { this.$emit("searchEvent",newValue) } }, emits: ["searchEvent"] } </script>
1 2 3 4 5 6 7 8 9 10 11 12 13 14 15 16 17 18 19 20 21 22 23 24 25 26 27 <template> <h3>Main</h3> 搜索内容为:<p>{{ search }}</p> <SearchComponent @searchEvent="getSearch"/> </template> <script> import SearchComponent from './SearchComponent.vue' export default { data() { return { search: "" } }, components: { SearchComponent }, methods: { getSearch(data) { this.search = data } } } </script>
除了上述的方案,props也可以实现子传父
通过父组件向子组件传递一个函数,而子组件实现函数返回参数给父组件
1 2 3 4 5 6 7 8 9 10 11 12 13 14 15 16 17 18 19 20 21 <template> <h3>ComponentA</h3> <p>{{ title }}</p> <p>{{ onEvent("传递数据") }}</p> </template> <script> export default { data() { return { } }, props: { title: String, onEvent: Function } } </script>
1 2 3 4 5 6 7 8 9 10 11 12 13 14 15 16 17 18 19 20 21 22 23 24 <template> <h3>ComponentB</h3> <ComponentA title="标题" :onEvent="dataFn"/> <p>{{ msg }}</p> </template> <script> import ComponentA from './ComponentA.vue'; export default { data() { return { msg: "" } }, components: { ComponentA }, methods: { dataFn(data) { this.msg = data } } } </script>
透传 Attributes “透传 attribute”指的是传递给一个组件,却没有被该组件声明为props或emits的attribute或者v-on事件监听器。最常见的例子就是class、style和id,当一个组件以单个元素为根作渲染时,透彻的attribute会自动被添加到根元素上
1 2 3 4 5 6 7 8 9 10 <template> <!-- 必须是唯一根元素 --> <h3>透传属性</h3> </template> <style> .attr-container { color: red; } </style>
1 2 3 4 5 6 7 8 9 10 11 12 13 14 15 16 17 18 19 20 21 22 23 24 25 26 27 <script> import ComponentEvent from './components/ComponentEvent.vue' import Main from './components/Main.vue' import ComponentB from './components/ComponentB.vue' import Attribute from './components/Attribute.vue' export default { data() { return { } }, components: { ComponentEvent, Main, ComponentB, Attribute } } </script> <template> <!-- <ComponentEvent/> --> <!-- <Main/> --> <!-- <ComponentB /> --> <Attribute class="attr-container"/> </template>
禁止继承
1 2 3 4 5 6 7 8 9 10 11 12 13 14 <template> <h3>透传属性</h3> </template> <script> export default { //禁止继承 inheritAttrs: false } </script> <style> .attr-container { color: red; } </style>
1 2 3 4 5 6 7 8 9 10 11 12 13 14 15 16 17 18 19 20 21 22 23 24 25 26 27 <script> import ComponentEvent from './components/ComponentEvent.vue' import Main from './components/Main.vue' import ComponentB from './components/ComponentB.vue' import Attribute from './components/Attribute.vue' export default { data() { return { } }, components: { ComponentEvent, Main, ComponentB, Attribute } } </script> <template> <!-- <ComponentEvent/> --> <!-- <Main/> --> <!-- <ComponentB /> --> <Attribute class="attr-container"/> </template>
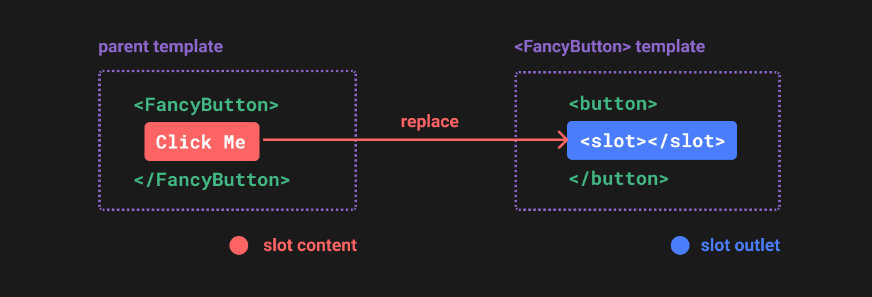
插槽 内容与出口 我们已经了解到组件能够接收任意类型的 JavaScript 值作为 props,但组件要如何接收模板内容呢?在某些场景中,我们可能想要为子组件传递一些模板片段,让子组件在它们的组件中渲染这些片段。
1 2 3 4 5 6 7 8 9 10 11 12 13 14 15 16 17 18 <template> <slotBase> <div> <h3>插槽标题</h3> <p>插槽内容</p> </div> </slotBase> </template> <script> import slotBase from "./components/slotBase.vue" export default { components: { slotBase } } </script>
1 2 3 4 5 6 7 8 <template> <h3>插槽基础</h3> <slot></slot> </template> <script> </script>
slot 元素是一个插槽出口 (slot outlet),标示了父元素提供的插槽内容 (slot content) 将在哪里被渲染。
渲染作用域 插槽内容可以访问到父组件的数据作用域,因为插槽内容本身是在父组件模板中定义的。
1 2 3 4 5 6 7 8 9 10 11 12 13 14 15 16 17 18 19 20 21 22 23 24 25 26 27 <template> <slotBase> <div> <h3>插槽标题</h3> <p>插槽内容</p> </div> </slotBase> <slotTwo> <h3>{{ msg }}</h3> </slotTwo> </template> <script> import slotBase from "./components/slotBase.vue" import slotTwo from './components/slotTwo.vue' export default { components: { slotBase, slotTwo }, data() { return { msg: "Hello world" } } } </script>
1 2 3 4 5 6 7 8 <template> <h3>插槽渲染作用域</h3> <slot></slot> </template> <script> </script>
默认内容 在外部没有提供任何内容的情况下,可以为插槽指定默认内容。
1 2 3 4 5 6 <template> <h3> 默认内容 </h3> <slot>默认内容值</slot> </template>
具名插槽 有时在一个组件中包含多个插槽出口是很有用的。
1 2 3 4 5 6 7 8 9 10 11 12 13 14 15 16 17 18 19 20 21 22 23 24 25 26 27 28 29 30 31 32 33 <template> <!-- <slotBase> <div> <h3>插槽标题</h3> <p>插槽内容</p> </div> </slotBase> --> <slotTwo> <h3>{{ msg }}</h3> <template v-slot:header> <h3>标题3</h3> </template> <template v-slot:main> <p>内容</p> </template> </slotTwo> </template> <script> import slotBase from "./components/slotBase.vue" import slotTwo from './components/slotTwo.vue' export default { components: { slotBase, slotTwo }, data() { return { msg: "Hello world" } } } </script>
1 2 3 4 5 6 7 8 9 10 <template> <h3>插槽渲染作用域</h3> <slot name="header">插槽1</slot> <hr> <slot name="main">插槽2</slot> </template> <script> </script>
v-slot有对应的简写#,因此<template v-slot:header>可以简写为<template #header>。其中意思就是“将这部分模板片段传入子组件的 header 插槽中”
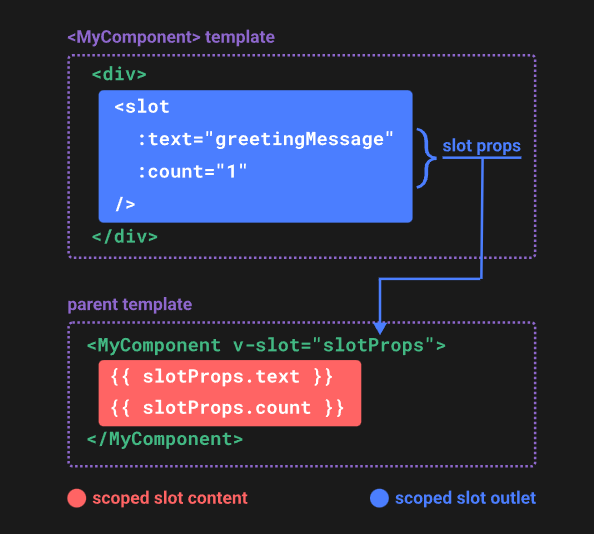
数据传递 在某些场景下,插槽的内容可能想要同时使用父组件域内和子组件域内的数据,要做到这一点,我们需要使用一种方法来让子组件在渲染时将一部分数据提供给插槽,可以像对组件传递props那样,向一个插槽的出口上传递attributes
1 2 3 4 5 6 7 8 9 10 11 12 13 14 15 16 17 18 19 20 21 22 23 24 25 26 27 28 29 30 31 32 33 34 35 36 37 38 39 <template> <!-- <slotBase> <div> <h3>插槽标题</h3> <p>插槽内容</p> </div> </slotBase> --> <!-- <slotTwo> <h3>{{ msg }}</h3> <template v-slot:header> <h3>标题3</h3> </template> <template v-slot:main> <p>内容</p> </template> </slotTwo> --> <slotAtrr v-slot="slotProps"> <h3>{{ currentTest }} - {{ slotProps.text }}</h3> </slotAtrr> </template> <script> import slotBase from "./components/slotBase.vue" import slotTwo from './components/slotTwo.vue' import slotAtrr from "./components/slotAtrr.vue"; export default { components: { slotBase, slotTwo, slotAtrr }, data() { return { msg: "Hello world", currentTest: "AG 夺冠" } } } </script>
1
2
3
4
5
6
7
8
9
10
11
12
13
14
<template> <h3>slot 传递数据</h3> <slot :text="child"></slot> </template> <script> export default { data() { return { child: "子元素数据" } } } </script>
具名插槽传递数据
1 2 3 4 5 6 7 8 9 10 11 12 13 14 15 16 17 18 19 20 21 22 23 24 25 26 27 28 29 30 31 32 33 34 35 36 37 38 39 40 41 42 43 44 <template> <!-- <slotBase> <div> <h3>插槽标题</h3> <p>插槽内容</p> </div> </slotBase> --> <!-- <slotTwo> <h3>{{ msg }}</h3> <template v-slot:header> <h3>标题3</h3> </template> <template v-slot:main> <p>内容</p> </template> </slotTwo> --> <slotAtrr> <template #header="slotProps"> <h3>{{ currentTest }} - {{ slotProps.text }}</h3> </template> <template #main="slotProps"> <p>{{ slotProps.demo }}</p> </template> </slotAtrr> </template> <script> import slotBase from "./components/slotBase.vue" import slotTwo from './components/slotTwo.vue' import slotAtrr from "./components/slotAtrr.vue"; export default { components: { slotBase, slotTwo, slotAtrr }, data() { return { msg: "Hello world", currentTest: "AG 夺冠" } } } </script>
1 2 3 4 5 6 7 8 9 10 11 12 13 14 15 16 <template> <h3>slot 传递数据</h3> <slot :text="child" name="header"></slot> <slot :demo="demo" name="main"></slot> </template> <script> export default { data() { return { child: "子元素数据", demo: "你好中国!" } } } </script>
生命周期 基础 每个 Vue 组件实例在创建时都需要经历一系列的初始化步骤,比如设置好数据侦听,编译模板,挂载实例到 DOM,以及在数据改变时更新 DOM。在此过程中,它也会运行被称为生命周期钩子的函数,让开发者有机会在特定阶段运行自己的代码。
1 2 3 4 5 6 7 8 9 10 11 12 13 14 15 16 17 18 19 20 21 22 23 24 25 26 27 28 29 30 31 32 33 34 35 36 37 38 39 40 41 42 43 44 45 46 47 48 49 50 51 52 53 54 55 56 57 58 59 60 <template> <h3>组件的生命周期</h3> <p>{{ message }}</p> <button @click="updateMessage">更新数据</button> </template> <script> /** * 生命周期函数 * 创建期: beforeCreate created * 挂载期: beforeMount mounted * 更新期: beforeUpdate updated * 销毁期: beforeUnmount unmounted * * * * */ export default { data() { return { message: "更新之前" } }, methods: { updateMessage() { this.message = "更新之后" } }, beforeCreate() { console.log("组件创建之前") }, created() { console.log("组件创建之后") }, beforeMount() { console.log("组件渲染之前") }, mounted() { console.log("组件渲染之后") }, beforeUpdate() { console.log("组件更新之前") }, updated() { console.log("组件更新之后") }, beforeUnmount() { console.log("组件销毁之前") }, unmounted() { console.log("组件销毁之后") } } </script>
应用 组件的生命周期随着我们对Vue的了解越来越多,也会越来越重要,以下是两个常见的应用:
通过ref获取元素 DOM 结构
1 2 3 4 5 6 7 8 9 10 11 12 13 14 15 16 17 18 19 20 21 <template> <h3>组件生命周期函数应用</h3> <p ref="name">百战程序员</p> </template> <script> export default { data() { return { } }, beforeMount() { console.log(this.$refs.name) // undefined }, mounted() { console.log(this.$refs.name) } } </script>
模拟网络请求渲染数据
1 2 3 4 5 6 7 8 9 10 11 12 13 14 15 16 17 18 19 20 21 22 23 24 25 26 27 28 29 30 31 32 33 34 35 36 37 38 39 40 41 42 43 <template> <h3>组件生命周期函数应用</h3> <p ref="name">百战程序员</p> <ul> <li v-for="(item,index) of banner" :key="index"> <h3>{{ item.title }}</h3> <p>{{ item.content }}</p> </li> </ul> </template> <script> export default { data() { return { banner: [] } }, beforeMount() { console.log(this.$refs.name) // undefined }, mounted() { console.log(this.$refs.name) // 模拟网络请求 this.banner = [ { "title": "题目A", "content": "内容A" }, { "title": "题目B", "content": "内容B" }, { "title": "题目C", "content": "内容C" } ] } } </script>
动态组件 有些场景需要在两个组件之间来回切换,比如 Tab 界面
A、B两个组件
1 2 3 4 5 6 7 8 9 10 11 12 13 14 15 16 17 18 19 20 21 22 23 24 25 <template> <component :is="tabComponent"></component> <button @click="changeHandler">切换组件</button> </template> <script> import A from "./components/A.vue" import B from "./components/B.vue" export default { data() { return { tabComponent: "A" } }, methods: { changeHandler() { this.tabComponent = this.tabComponent == "A" ? "B" : "A" } }, components: { A, B } } </script>
组件保持存活
当使用 <component :is="...">时来在多个组件之间作切换时,被切换掉的组件会被卸载。我们可以通过<keep-alive>组件强制被切换掉的组件仍然保持“存活”的状态
1 2 3 4 5 6 7 8 9 10 11 12 13 14 15 16 17 18 19 20 21 22 23 24 25 26 27 <template> <keep-alive> <component :is="tabComponent"></component> </keep-alive> <button @click="changeHandler">切换组件</button> </template> <script> import A from "./components/A.vue" import B from "./components/B.vue" export default { data() { return { tabComponent: "A" } }, methods: { changeHandler() { this.tabComponent = this.tabComponent == "A" ? "B" : "A" } }, components: { A, B } } </script>
1 2 3 4 5 6 7 8 9 10 11 12 13 14 15 16 17 18 19 20 21 22 23 24 25 26 27 <template> <h3>A组件</h3> <p>{{ message }}</p> <button @click="updateMessage">更新数据</button> </template> <script> export default { data() { return { message: "Hello World!" } }, methods: { updateMessage() { this.message = "你好中国!" } }, beforeUnmount() { console.log("组件被卸载之前") }, unmounted() { console.log("组件被卸载之后") } } </script>
1 2 3 4 5 6 7 <template> <h3>B组件</h3> </template> <script> </script>
异步组件 在大型项目中,我们可能需要拆分应用为更小的块,并仅在需要时再从服务器加载相关组件。Vue 提供了 defineAsyncComponent
1 2 3 4 5 6 7 8 9 10 11 12 13 14 15 16 17 18 19 20 21 22 23 24 25 26 27 28 29 30 31 32 <template> <keep-alive> <component :is="tabComponent"></component> </keep-alive> <button @click="changeHandler">切换组件</button> </template> <script> import A from "./components/A.vue" // import B from "./components/B.vue" //异步加载组件 import { defineAsyncComponent } from "vue" const B = defineAsyncComponent(() =>{ import ('./components/B.vue') }) export default { data() { return { tabComponent: "A" } }, methods: { changeHandler() { this.tabComponent = this.tabComponent == "A" ? "B" : "A" } }, components: { A, B } } </script>
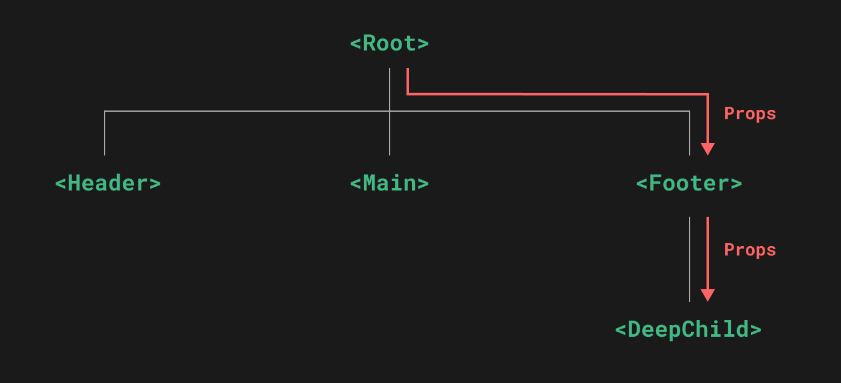
依赖注入 Prop 逐级透传问题 通常情况下,当我们需要从父组件向子组件传递数据时,会使用 props 。想象一下这样的结构:有一些多层级嵌套的组件,形成了一棵巨大的组件树,而某个深层的子组件需要一个较远的祖先组件中的部分数据。在这种情况下,如果仅使用 props 则必须将其沿着组件链逐级传递下去,这会非常麻烦
Provide(提供)
要为组件后代提供数据,需要用到provide选项
1 2 3 4 5 6 7 8 9 10 11 12 13 14 15 16 <template> <h3>祖宗</h3> <parent /> </template> <script> import Parent from './components/Parent.vue' export default { components: { Parent }, provide: { message: "爷爷的财产" } } </script>
1 2 3 4 5 6 7 8 9 10 11 12 13 14 15 16 17 <template> <h3>Child</h3> <p>{{ message }}</p> <p>{{ fullMessage }}</p> </template> <script> export default { inject: ["message"], data() { return { fullMessage: this.message } } } </script>
温馨提示
provide和inject只能由上到下的传递,不能反向传递
除了在一个组件中提供依赖,我们还可以在整个应用层面提供依赖
1 2 3 >import{ createApp } from 'vue' >const app = create({}) >app.provide(/* 注入名 */ 'message', /* 值 */ 'hello!')
Vue 应用 应用实例
每个 Vue 应用都是通过createApp函数创建一个新的应用实例
1 2 3 4 5 6 import { createApp } from 'vue' // 在一个 Vue 项目中,有且只有一个 Vue 的实例对象 const app = createApp({ /* 根组件选项 */ })
根组件
我们传入的createApp的对象实际上是一个组件,每个应用都需要一个“根组件”,其他组件将作为其子组件。
1 2 3 4 5 6 import { createApp } from 'vue' //从一个单文件组件中导入根组件 import App from './App.vue' const app = createApp(app)
挂载应用
应用实例必须在调用了.mount()方法后才会被渲染,该方法接收一个“容器参数”,可以是一个实际的 DOM 元素或者是一个 CSS 选择器字符串
1 2 3 app.mount('#app') //浏览器可执行文件:HTML CSS JavaScript Image //构建工具:Webpack vite
1 2 3 4 <body > <div id ="app" > </div > <script type ="module" src ="/src/main.js" > </script > </body >
公共资源
在src目录下的assets文件夹的作用就是存放公共资源,例如:图片、公共 CSS 或者字体图标等
路由机制 router 路由:就是根据不同的 URL 地址展示不同的内容或者页面。
路由的作用:
单页应用程序(SPA)中,路由可以实现不同视图之间的无刷新切换,提升用户体验;
路由还可以实现页面的认证和权限控制,保护用户的隐私和安全;
路由还可以利用浏览器的前进和后退,帮助用户更好地回到之前访问过的页面
创建项目和导入路由依赖
1 2 3 npm create vite //创建项目cd 项目文件夹 // 进入项目录文件夹 npm install //安装项目需求依赖 npm install vue-router //安装全局的vue - router
路由的基本使用 1 2 3 4 5 6 7 8 9 10 //Add.vue <script setup> </script> <template> <div> <h3>Add</h3> </div> </template>
1 2 3 4 5 6 7 8 9 10 List.vue <script setup> </script> <template> <div> <h3>List</h3> </div> </template>
1 2 3 4 5 6 7 8 9 10 Home.vue <script setup> </script> <template> <div> <h3>home</h3> </div> </template>
1 2 3 4 5 6 7 8 9 10 Update.vue <script setup> </script> <template> <div> <h3>Update</h3> </div> </template>
1 2 3 4 5 6 7 8 9 10 11 12 13 14 15 16 17 18 19 20 21 22 23 24 25 26 27 28 29 30 31 32 33 34 35 36 37 38 39 40 41 42 43 44 45 46 47 48 49 50 51 52 53 54 55 56 57 58 59 60 import { createRouter,createWebHashHistory} from 'vue-router' import Home from '../components/Home.vue' import List from '../components/List.vue' import Add from '../components/Add.vue' import Update from '../components/Update.vue' const router = createRouter ({ history : createWebHashHistory (), routes : [ { path :"/home" , components : { default : Home , homeView : Home } }, { path :"/list" , components : { listView : List } }, { path :"/update" , components : { updateView : Update } }, { path :"/add" , components : { addView : Add } }, { path :"/" , components : { homeView : Home } }, { path :"/showAll" , components : { listView : List } } ] }) export default router
1 2 3 4 5 6 7 8 9 10 11 12 13 14 import { createApp } from 'vue' import App from './App.vue' import router from './router/router.js' const app = createApp (App )app.use (router) app.mount ('#app' )
1 2 3 4 5 6 7 8 9 10 11 12 13 14 15 16 17 18 19 20 21 22 23 24 25 26 27 28 29 30 31 32 33 34 35 36 37 38 39 40 App.vue <script setup> /* 使用路由实现页面的切换,需要使用router-view和router-link标签 一个视图上是可以存在多个router-view的 每个router-view都可以设置专门用来展示哪个组件 但是一般来说,一个.vue文件中只需要使用一个router-view标签即可 */ </script> <template> <div> App 开头的内容<br> <router-link to="/home">home页</router-link><br> <router-link to="/list">list页</router-link><br> <router-link to="/update">update页</router-link><br> <router-link to="/add">add页</router-link><br> <hr> <!-- 该标签会被替换成具体的.vue --> <router-view></router-view> <hr> home页<router-view name="homeView"></router-view> <hr> list页<router-view name="listView"></router-view> <hr> update页<router-view name="updateView"></router-view> <hr> add页<router-view name="addView"></router-view> <hr> App 结尾的内容 </div> </template> <style scoped> </style>
编程式路由 1 <router-link to="/list">list页</router-link>
普通路由这种方式,to中的内容目前是固定的,点击后只能切换 /list对象组件(声明式路由),而对于编程式路由
通过useRouter,动态决定向哪个组件切换的路由
在 Vue3 和 Vue Router 4 中,可以使用useRouter来实现动态路由(编程式路由)
其中这里的useRouter方法放回的是一个router对象,可以用它来做导航到新页面,返回到上一页面操作
1 2 3 4 5 6 7 8 9 10 11 12 13 14 15 16 17 18 19 20 21 22 23 24 25 26 27 28 29 30 31 32 33 34 35 36 37 38 39 40 41 42 43 44 45 46 47 48 49 50 51 52 53 54 55 56 57 58 59 App.vue <script setup> /* 使用路由实现页面的切换,需要使用router-view和router-link标签 一个视图上是可以存在多个router-view的 每个router-view都可以设置专门用来展示哪个组件 但是一般来说,一个.vue文件中只需要使用一个router-view标签即可 */ import { useRouter } from 'vue-router' import { ref } from 'vue' const router = useRouter() let mypath = ref("") // function showList() { // //编程式路由实现页面跳转 // // router.push("/list") // router.push({path: "/list"}) // } function goMypage() { router.push(mypath.value) } </script> <template> <div> App 开头的内容<br> <router-link to="/home">home页</router-link><br> <router-link to="/list">list页</router-link><br> <router-link to="/update">update页</router-link><br> <router-link to="/add">add页</router-link><br> <hr> <!-- 该标签会被替换成具体的.vue --> <!-- 声明式路由 --> <router-view></router-view> <hr> <!-- home页<router-view name="homeView"></router-view> <hr> list页<router-view name="listView"></router-view> <hr> update页<router-view name="updateView"></router-view> <hr> add页<router-view name="addView"></router-view> <hr> --> <!-- 编程式路由 --> <!-- <button @click="showList()">list</button> --> <button @click="goMypage()">Go</button><input type="text" v-model="mypath"> <br> App 结尾的内容 </div> </template> <style scoped> </style>
其他文件内容大致与普通路由相同
路由传参 路径参数:在路径中使用一个动态字段来实现
例查看数据详情/showAll/1,1就是我们要查看详情的 id ,可以动态添值
键值对参数:类似于与 get 请求通过 url 传参,数据就是键值对形式的
例如:查看数据详情:/showAll?hid=1,hid=1就是要传递的键值对参数
在 Vue3 和 Vue Router 4 中,可以使用useRoute这个函数从 Vue 的组合式 API 中获取路由对象
useRoute方法返回的是当前的 route 对象,可以用它去获取关于当前路由的信息,如当前的路径、查询参数等
1 2 3 4 5 6 7 8 9 10 11 12 13 14 15 16 17 18 19 20 21 22 23 24 25 26 27 28 29 30 31 32 33 34 35 36 37 38 39 //App.vue App.vue <script setup> import { useRouter } from 'vue-router' import { ref } from 'vue' import ShowDetail from './components/ShowDetail.vue'; const router = useRouter() function showData(id,language) { router.push(`/showDetail/${id}/${language}`) } function showData2(id,language) { // router.push(`/showDetail2?id=${id}&language=${language}`) router.push({path:'/showDetail2',query: {id:id,language:language}}) } </script> <template> <div> App 开头的内容<br> <router-link to="/showDetail/1/Java">声明式路由路径传参</router-link><br> <button @click="showData(2,'PHP')">编程式路由路径传参</button><br> <hr> <router-link to="/showDetail2?id=1&language=Java">声明式路由键值对传参</router-link><br> <router-link v-bind:to="{path:'/showDetail2',query:{id:2,language:'PHP'}}">声明式路由键值对传参</router-link><br> <button @click="showData2(3,'Python')">编程式路由键值对传参</button> <hr> <router-view></router-view> <hr> App 结尾的内容 </div> </template> <style scoped> </style>
1 2 3 4 5 6 7 8 9 10 11 12 13 14 15 16 17 18 19 20 21 22 23 24 25 26 27 28 29 //ShowDetail.vue <script setup> // 接收传递过来的路径参数 // useRoute 函数用来接收参数 //route.params 表示路径参数 //route.query 表示键值对参数 import { useRoute } from 'vue-router' import { ref,onUpdated } from 'vue' let languageId = ref(0) let languageName = ref("") let route = useRoute() languageId = route.params.id languageName = route.params.language onUpdated(() => { languageId = route.params.id languageName = route.params.language }) </script> <template> <div> <h3>ShowDetail接收路径参数</h3> <h3>{{ languageId }}</h3> <h3>{{ languageName }}</h3> </div> </template>
1 2 3 4 5 6 7 8 9 10 11 12 13 14 15 16 17 18 19 20 21 22 23 24 25 26 27 28 29 //ShowDetail2.vue <script setup> // 接收传递过来的路径参数 // useRoute 函数用来接收参数 //route.params 表示路径参数 //route.query 表示键值对参数 import { useRoute } from 'vue-router' import { ref,onUpdated } from 'vue' let languageId = ref(0) let languageName = ref("") let route = useRoute() languageId = route.query.id languageName = route.query.language onUpdated(() => { languageId = route.query.id languageName = route.query.language }) </script> <template> <div> <h3>ShowDetail2接收键值对参数</h3> <h3>{{ languageId }}</h3> <h3>{{ languageName }}</h3> </div> </template>
1 2 3 4 5 6 7 8 9 10 11 12 13 14 15 16 17 18 19 20 21 22 23 24 25 26 27 28 29 30 31 32 33 34 35 36 37 38 39 40 41 42 43 44 45 46 47 48 49 50 51 52 53 54 55 56 57 import { createRouter,createWebHashHistory} from 'vue-router' import Home from '../components/Home.vue' import List from '../components/List.vue' import Add from '../components/Add.vue' import Update from '../components/Update.vue' import ShowDetail from '../components/ShowDetail.vue' import ShowDetail2 from '../components/ShowDetail2.vue' const router = createRouter ({ history : createWebHashHistory (), routes : [ { path :"/home" , component : Home }, { path :"/list" , component : List }, { path :"/update" , component : Update }, { path :"/add" , component : Add }, { path :"/" , component : Home }, { path :"/showAll" , component : List }, { path :"/showDetail/:id/:language" , component : ShowDetail }, { path : "/showDetail2" , component : ShowDetail2 } ] }) export default router
路由守卫 在 Vue3 中,路由守卫是用于在路由切换期间进行一些特定任务的回调函数,路由守卫可以用于许多任务,例如验证用户是否登录、在路由由切换前提供确认提示,请求数据等。Vue3 为路由守卫提供了全面的支持,并提供了以下几种类型的路由守卫:
全局前置守卫:在路由切换前被调用,可以用于验证用户是否已登录、中断导航、请求数据等。
全局后置守卫:在路由切换之后被调用,可以用于处理数据、操作 DOM、记录日志等。
守卫代码的位置:在 router.js 中
1 2 3 4 5 6 7 8 9 10 11 12 13 14 15 16 17 18 19 20 21 22 23 24 25 26 27 28 29 30 31 32 33 34 35 36 37 38 39 40 41 42 43 44 45 46 47 48 49 50 51 52 53 54 55 56 57 58 59 60 61 62 63 64 65 66 67 68 69 70 71 72 73 74 75 76 77 78 79 80 81 82 83 import { createRouter,createWebHashHistory} from 'vue-router' import Home from '../components/Home.vue' import List from '../components/List.vue' import Add from '../components/Add.vue' import Update from '../components/Update.vue' import ShowDetail from '../components/ShowDetail.vue' import ShowDetail2 from '../components/ShowDetail2.vue' const router = createRouter ({ history : createWebHashHistory (), routes : [ { path :"/home" , component : Home }, { path :"/list" , component : List }, { path :"/update" , component : Update }, { path :"/add" , component : Add }, { path :"/" , component : Home }, { path :"/showAll" , component : List }, { path :"/showDetail/:id/:language" , component : ShowDetail }, { path : "/showDetail2" , component : ShowDetail2 } ] }) router.beforeEach ( (to,from ,next ) => { console .log ("beforeEach" ) console .log (from .path ) console .log (to.path ) next () }) router.afterEach ( (to,from ) => { console .log ("afterEach" ) console .log (from .path ) console .log (to.path ) }) export default router
路由测试案例 1 2 3 4 5 6 7 8 9 10 11 12 13 14 15 16 17 18 19 20 21 22 23 24 25 26 27 28 29 30 31 32 33 34 35 36 37 38 39 40 41 import { createRouter,createWebHashHistory } from "vue-router" import Login from '../components/Login.vue' import Home from '../components/Home.vue' const router = createRouter ({ history : createWebHashHistory (), routes : [ { path : "/home" , component : Home }, { path : "/login" , component : Login } ] }) router.beforeEach ( (to,from ,next ) => { if (to.path == '/login' ) { next () }else { const username = window .sessionStorage .getItem ("username" ) if (username != null ) { next () } else { next ('/login' ) } } }) export default router
1 2 3 4 5 6 7 8 9 10 11 12 13 14 15 //App.vue <script setup> </script> <template> <div> <router-view></router-view> </div> </template> <style scoped> </style>
1 2 3 4 5 6 7 8 9 10 11 12 13 14 15 16 17 18 19 20 21 22 23 24 25 26 27 28 29 30 31 32 33 34 35 36 37 38 39 40 41 42 43 //Login.vue <script setup> import {ref} from 'vue' import {useRouter} from 'vue-router' let router = useRouter() let username = ref('') let password = ref('') //获取用户名和密码,如果密码是123456并且用户名为root,则登录成功 //登录成功则自动跳转到 /home function login() { if(username.value == 'root' && password.value == '123456') { //路由跳转 /home router.push("/home") // 将用户名保存再浏览器上 window.sessionStorage.setItem("username",username.value) }else { alert('用户名或者密码错误') } } </script> <template> <div> 账号:<input type="text" v-model="username"><br> 密码:<input type="password" v-model="password"><br> <button @click="login()">登录</button> </div> </template> <style scoped> </style>
1 2 3 4 5 6 7 8 9 10 11 12 13 14 15 16 17 18 19 20 21 22 23 24 25 26 27 28 29 // Home.vue <script setup> import {ref} from 'vue' import { useRouter } from 'vue-router' const router = useRouter() let username = ref('') username.value = window.sessionStorage.getItem('username') function logout() { //清除sessionStorage中的用户信息 window.sessionStorage.removeItem("username") //跳转到 /login页面 router.push('/login') } </script> <template> <div> <h1>Home页面</h1> <h3>欢迎{{ username }}登录</h3> <button @click="logout()">退出登录</button> </div> </template> <style scoped> </style>
数据交互 Promise 普通函数:正常调用的函数,一般函数执行完毕后才会执行下一行代码
回调函数:一些特殊的函数,表示未来才会执行的一些功能,后续代码不会等待该函数执行完毕就开始执行了
promise:前端中的异步编程技术,类似于 Java 中的多线程+线程结果回调
它是一种异步编程的一种解决方案,比传统的解决方案—-回调函数和事件更加合理和强大。ES6将其写入了语言标准,统一了用法,原生提供了Promise对象。
所谓Promise,简单说就是一个容器,里面保存着某个未来才会结束的事件(通常是一个异步操作)的结果。从语法上来讲,Promise是一个对象,从它可以获取异步操作的消息。Promise提供了统一的 API ,各种异步操作都可以用同样的方法进行处理。
Promise的对象有以下两个特点:
Promise 对象代表一个异步操作,有三种状态:Pending(进行中),Resolved(已完成,又称 FullFilled),和Rejected(已失败)。只要有异步操作的结果,可以决定当前是哪一种状态,任何其他操作都无法改变这种状态,这也是promise的名字由来。
一旦状态改变,就不会再变,任何时候都可以得到这个结果。Promise对象的状态改变,只有两种可能:从Pending变为Resolve和从Pending变为Rejected,只要这两种情况发生,状态就凝固了,不会在变了,会一直保持这个结果。
基本用法 ES6 规定,Promise 对象是一个构造函数,用来生成 Promsie 实例。
1 2 3 4 5 6 7 8 9 10 11 12 13 14 15 16 17 18 19 20 21 22 23 24 25 26 27 28 29 30 31 32 33 34 35 36 37 38 39 40 <!DOCTYPE html > <html lang ="en" > <head > <meta charset ="UTF-8" > <meta name ="viewport" content ="width=device-width, initial-scale=1.0" > <title > Document</title > </head > <body > <script > let promise = new Promise (function (resolve,reject ){ console .log ("function invoked" ) throw new Error ("error message" ) }) console .log ("other code1" ) let promise2 = promise.then ( function (data ) { console .log ("promise success " +data) } ).catch ( function (data ) { console .log ("promise fail " +data) } ) console .log ("other code2" ) </script > </body > </html >
await和async的用法 1 2 3 4 5 6 7 8 9 10 11 12 13 14 15 16 17 18 19 20 21 22 23 24 25 26 27 28 29 30 31 32 33 34 35 36 37 38 39 40 41 42 43 44 45 46 47 48 49 50 51 52 53 54 55 56 57 58 59 60 61 62 <!DOCTYPE html > <html lang ="en" > <head > <meta charset ="UTF-8" > <meta name ="viewport" content ="width=device-width, initial-scale=1.0" > <title > Document</title > </head > <body > <script > async function func1 ( return 10 } async function func2 ( try { let res = await Promise .reject ("something wrong" ) }catch (e) { console .log ("catch got: " + res ) } console .log ("await got: " + res) } func2 () </script > </body > </html >
Axios 基本用法 Axios是一个基于promise网络请求库,作用于node.js
随机土味情话网站:https://api.uomg.com/api/rand.qinghua?format=json
API 测试网站:https://httpbin.org
1 https://api.uomg·.com/api/rand.qinghua?format=jso
1 2 3 4 5 6 7 8 9 10 11 12 13 14 15 16 17 18 19 20 21 22 23 24 25 26 27 28 29 30 31 32 33 34 35 36 37 38 39 40 41 42 43 44 45 46 47 48 49 50 51 52 53 54 55 56 57 58 //App.vue <script setup> import axios from 'axios' import {reactive, ref} from 'vue' // let message = ref('') let message = reactive( { "code": 1, "content": "" }) function getMessage() { // 使用axios发送请求获取土味情话 // axios({设置请求的参数}) url 方式 参数 let promise = axios({ method: "get", url: "https://api.uomg.com/api/rand.qinghua?format=json", data: { // 如果请求方式是get 则data中的数据会以键值对的形式放在url后面 // 如果请求方式为post 则data中的数据会以 JSON形式放入请求体 } }) promise.then( function(res) { console.log(res) // res代表响应结果对象 // data 服务端响应回来的数据 // status 响应状态码 200 // statusText 响应状态描述 OK // headers 本次响应的所有响应头 // config 本次请求的配置信息 // require 本次请求发送时所使用的XMLHttpRequest对象 console.log(res.data) console.log(res.data.code) console.log(res.data.content) // message.content = res.data.content // message.code = res.data.code Object.assign(message,res.data) } ).catch( function() { } ) } </script> <template> <div> <h1 v-text="message.content"></h1> <button @click="getMessage()">切换</button> </div> </template> <style scoped> </style>
1 2 3 4 5 6 7 8 9 10 11 12 13 14 15 16 17 18 19 20 21 22 23 24 25 26 27 28 29 30 31 32 33 34 35 36 37 38 39 40 41 42 43 44 45 46 47 48 49 50 51 52 53 54 55 56 57 58 59 60 61 62 63 64 65 66 //App.vue <script setup> import axios from 'axios' import {reactive, ref} from 'vue' // let message = ref('') let message = reactive( { "code": 1, "content": "" }) function getMessage() { // 使用axios发送请求获取土味情话 // axios({设置请求的参数}) url 方式 参数 let promise = axios({ method: "post", url: "https://api.uomg.com/api/rand.qinghua", data: { format: 'json', username: '张三' // 如果请求方式是get 需要通过params进行发送 // 如果请求方式为post 并且使用data 则data中的数据会以 JSON形式放入请求体 // 这里的数据会放入请求体的前提是 请求方式必须是post }, params: { //都是以键值对的方式将数据放入到url后 format: 'json', username: '张三' } }) promise.then( function(res) { console.log(res) // res代表响应结果对象 // data 服务端响应回来的数据 // status 响应状态码 200 // statusText 响应状态描述 OK // headers 本次响应的所有响应头 // config 本次请求的配置信息 // require 本次请求发送时所使用的XMLHttpRequest对象 console.log(res.data) console.log(res.data.code) console.log(res.data.content) // message.content = res.data.content // message.code = res.data.code Object.assign(message,res.data) } ).catch( function() { console.log("error") } ) } </script> <template> <div> <h1 v-text="message.content"></h1> <button @click="getMessage()">切换</button> </div> </template> <style scoped> </style>
Get和Post方法 1 2 3 4 5 6 7 8 9 10 11 12 13 14 15 16 17 18 19 20 21 22 23 24 25 26 27 28 29 30 31 32 33 34 35 36 37 38 39 40 41 42 43 44 45 46 47 48 49 50 51 52 53 54 55 56 57 58 59 60 61 62 63 64 65 66 67 68 69 70 71 72 73 74 75 76 77 78 79 80 81 82 83 84 //App.vue <script setup> import axios from 'axios' import {reactive, ref} from 'vue' // let message = ref('') let message = reactive( { "code": 1, "content": "" }) // function getWords() { // return axios({ // method: "post", // url: "https://api.uomg.com/api/rand.qinghua", // params: { // //都是以键值对的方式将数据放入到url后 // format: 'json', // username: '张三' // } // }) // } function getWords() { //发送get请求的方法 返回的也是一个promise对象 //axios.get(url) //axios.get(url,{请求的其他信息}) //axios.get(url,{params:{键值对参数},header:{设置一些特殊的请求头}}) //发送post请求 //axios.post(url,{要放入请求体的json串},{请求的其他信息}) // return axios.get("https://api.uomg.com/api/rand.qinghua?format=json") // return axios.get( // "https://api.uomg.com/api/rand.qinghua", // { // params: { // format: "json", // username: "zhangsan", // userpwd: "123456" // }, // headers: { // Accept: "application/json, text/plain, text/html,*/*" // } // } // ) return axios.post( "https://api.uomg.com/api/rand.qinghua", { username: "zhangsan", userpwd: "123456" }, { params: { format: "json", }, headers: { Accept: "application/json, text/plain, text/html,*/*" } } ) // return axios.post("https://api.uomg.com/api/rand.qinghua?format=json") } async function getMessage() { //解构 let {data} = await getWords() Object.assign(message,data) } </script> <template> <div> <h1 v-text="message.content"></h1> <button @click="getMessage()">切换</button> </div> </template> <style scoped> </style>
拦截器 如果在 Axios 发送请求之前,或者是数据响应回来再执行 then 方法之前做一些额外的工作,可以通过拦截器完成
1 2 3 4 5 6 7 8 9 10 11 12 13 14 15 16 17 18 19 20 21 22 23 24 25 26 27 28 29 30 31 32 33 34 35 36 37 38 39 40 41 42 43 44 45 46 47 48 49 import axios from 'axios' const instance = axios.create ({ }) instance.interceptors .request .use ( (config ) => { console .log ("请求前拦截器" ) config.headers .Accept = "application/json, text/plain, text/html,*/*" return config }, (error ) => { console .log ("请求前拦截器异常方法" ) return Promise .reject ("something Wrong" ) } ) instance.interceptors .response .use ( function (res ) { console .log ("response Success: " + res) console .log (res.data ) return res }, function (error ) { console .log ("Fail response: " + error) return Promise .reject ("Something Wrong" ) } ) export default instance
浏览器同源禁止策略 当前端服务器和后端服务器不相同,并且前端需要发送请求给后端,让后端响应数据时,对于浏览器而言,请求来自于前端服务器,数据来自于后端服务器,浏览器会认为该数据不安全,会报错,这个就叫浏览器同源禁止策略 。
一种解决方案是利用代理模式 ,即让前端服务器自己去后端服务器拉取数据然后再传递给浏览器。这样做的优点是代码稳健性强,但缺点便是会给前端服务器造成太大压力,性能较差。
另一种解决方案是让浏览器先给后端服务器发出一个预检请求,确认可以安全跨域。当后端向浏览器响应回可以跨域的信息时,客户端再正式发一个请求过去拿去数据。值得注意的是,预检请求在第一次发出之后可以不在接下来的一段时间重复发送,我们可以设置一个时间,超过了这个时间之后再去发一次预检请求。这样一来,我们需要在浏览器和后端服务器之间放置一个跨域过滤器,用于判断请求信息是否为跨域请求。
以下代码了解即可,实际开发当中跨域问题的处理在框架里只需要写注解即可。
1 2 3 4 5 6 7 8 9 10 11 12 13 14 15 16 17 18 19 20 21 22 23 24 25 26 27 28 29 30 31 32 33 34 35 36 37 38 39 40 41 package cn.hnu.schedule.filter;import cn.hnu.schedule.common.Result;import cn.hnu.schedule.util.WebUtil;import jakarta.servlet.*;import jakarta.servlet.annotation.WebFilter;import jakarta.servlet.http.HttpServletRequest;import jakarta.servlet.http.HttpServletResponse;import java.io.IOException;@WebFilter("/*") public class CrosFilter implements Filter { @Override public void doFilter (ServletRequest servletRequest, ServletResponse servletResponse, FilterChain filterChain) throws IOException, ServletException { HttpServletRequest request = (HttpServletRequest) servletRequest; HttpServletResponse response = (HttpServletResponse) servletResponse; response.setHeader("Access-Control-Allow-Origin" , "*" ); response.setHeader("Access-Control-Allow-Methods" , "POST, GET, PUT, OPTIONS, DELETE, HEAD" ); response.setHeader("Access-Control-Max-Age" , "3600" ); response.setHeader("Access-Control-Allow-Headers" , "access-control-allow-origin, authority, content-type, version-info, X-Requested-With" ); if (request.getMethod().equalsIgnoreCase("OPTIONS" )) { WebUtil.writeJson(response, Result.ok(null )); } else { filterChain.doFilter(servletRequest, servletResponse); } } }
状态管理-Pinia 如何实现多个组件之间的数据传递?
方式1:组件传参
方式2:路由传参
方式3:通过 pinia 状态管理定义共享属性
当我们有多个组件共享一个共同的状态(数据源)时,多个视图可能都依赖于同一份状态。来自不同视图的交互也可能需要更改同一份状态。虽然我们的手动状态管理方案(props、组件之间的通信,模块化)在简单的场景下够用,但是在大规模的生产应用中还有很多其他事项需要考虑
Pinia 就是一个实现了上述需求的状态管理库,由 Vue 核心团队维护,对 Vue2 和 Vue3 都可用。
pinia 数据无法进行持久化
pinia 结合 sessionStorage和 localStorage 可以实现持久化
在实际开发当中,我们可以利用 Pinia 定义多个公共的共享数据,默认均为响应式数据,这样一来,不同组件就可以使用这些响应式数据了(有点类似于后端的 Session 域对象)。但是光靠 Pinia 本身是无法对数据进行持久化存储的,意味着假设利用 Pinia 进行存储,在浏览器上刷新之后这些存储的数据就会被清空掉。故我们还需要结合 SessionStorage 和 LocalStorage 解决上述无法持久化存储的问题。
基本使用 开始创建项目之前我们需要执行 npm install pinia 命令安装对应依赖。
在 src 中创建一个 store 目录,然后创建一个 store.js 文件:
1 2 3 4 5 6 7 8 9 10 11 12 13 14 15 16 17 18 19 import { defineStore } from 'pinia' export const definedPerson = defineStore ({ id :"personPinia" , state :()=> { return {username :"zhangsan" , age :18 , hobbies :["唱歌" , "跳舞" ]} }, getters :{ getAge :(state )=> {return state.age }, getHobbyCount (return this .hobbies .length } }, actions :{ doubleAge (this .age *= 2 } } })
在 main.js 中需要使用 pinia:
1 2 3 4 5 6 7 8 9 10 11 12 import { createApp } from 'vue' import App from './App.vue' import { router } from './routers/router.js' import { createPinia } from 'pinia' let pinia = createPinia ()createApp (App ).use (router).use (pinia).mount ('#app' )
在组件 .vue 文件中使用 pinia 中定义的数据:
1 2 3 4 5 6 7 8 9 10 11 12 13 14 15 16 <script setup> //导入pinia数据 import { definedPerson } from '../store/store.js' //获得共享数据 let person = definedPerson() </script> <template> <div> <h1>用于修改pinia数据</h1> {{ person }} </div> </template> <style scoped> </style>
setup 语法糖 上面的基本写法真的是太折磨人了,写起来很别扭,所以,利用 setup 语法糖可以让代码更加简洁。在 setup 语法糖中:ref 就是 state 属性;computed 计算属性就是 getters;function 就是 actions。
1 2 3 4 5 6 7 8 9 10 11 12 13 14 15 16 17 18 19 20 21 22 23 24 25 import { defineStore } from 'pinia' import { computed, ref } from 'vue' export const useMoneyStore = defineStore ('money' , ()=> { const money = ref (100 ) const rmb = computed (() => money.value ) const usd = computed (() => money.value * 0.14 ) const eur = computed (() => money.value * 0.13 ) const win = (arg ) => { money.value += arg } const pay = (arg ) => { money.value -= arg } return {money , rmb, usd, eur, win, pay} }, { persist : true })
在路由文件中使用 在路由文件中使用 Pinia,我们需要对外提供一个 pinia 对象,然后使用这个对象在路由文件中创建对应的共享数据。
在 src 目录中创建 pinia.js 文件,对外暴露 pinia 对象:
1 2 3 4 5 6 import { createPinia } from 'pinia' let pinia = createPinia ()export default pinia
路由文件中使用 pinia 对象来创建共享数据:
1 2 3 4 5 6 7 8 9 10 11 12 13 import pinia from '../pinia.js' import { defineUser } from '../store/userStore.js' let sysUser = defineUser (pinia)const router = createRouter ({ }) export { router }
常见 API 1 2 3 4 5 6 7 8 9 10 11 12 13 14 15 16 17 18 19 20 21 22 23 24 25 26 27 28 29 30 <script setup> //导入pinia数据 import { definedPerson } from '../store/store.js' //获得共享数据 let person = definedPerson() </script> <template> <div> <h1>用于修改pinia数据</h1> 名字: <input type="text" v-model="person.username"><br> 年龄: <input type="text" v-model="person.age"><br> 爱好: <br> <input type="checkbox" value="吃饭" v-model="person.hobbies">吃饭<br> <input type="checkbox" value="睡觉" v-model="person.hobbies">睡觉<br> <input type="checkbox" value="唱歌" v-model="person.hobbies">唱歌<br> <input type="checkbox" value="跳舞" v-model="person.hobbies">跳舞<br> <input type="checkbox" value="rap" v-model="person.hobbies">rap<br> <button @click="person.doubleAge()">年龄加倍</button> <!-- 调用$reset方法恢复默认值 --> <button @click="person.$reset()">恢复默认值</button> <!-- 调用$patch方法一次性修改多个属性值 --> <button @click="person.$patch({username:'热心市民灰灰', age:19, hobbies:['写代码']})">变身</button> <hr> {{ person }} </div> </template> <style scoped> </style>
pinia 持久化 Pinia 默认是内存存储 ,当刷新浏览器的时候会丢失数据。我们可以使用插件 Persist 将 pinia 中的数据持久化的存储起来。
安装 Persist 插件:npm install pinia-persistedstate-plugin。
接下来,在 pinia 中使用插件(main.js 文件中进行编码):
1 2 3 4 5 6 7 import { createPersistedState } from "pinia-persistedstate-plugin" const pinia = createPinia ()const persist = createPersistedState ()pinia.use (persist) app.use (pinia)
然后定义状态 store 时指定持久化配置参数:
1 2 3 4 5 6 7 8 9 10 11 12 13 14 15 16 17 18 export const useTokenStore = defineStore ('token' , ()=> { const token = ref ('' ) const setToken = (newToken ) => { token.value = newToken } const removeToken = ( token.value = '' } return {token, setToken, removeToken} }, { persist : true })
Element-plus
Element Plus 是一套基于 Vue3 的开源 UI 组件库,是由饿了么前端团队开发的升级版本的 Element UI。Element Plus 提供了丰富的 UI 组件(Element UI 组件库是针对于 Vue2 开发的),易于使用的 API 接口和灵活的主题定制功能,可以帮助开发者快速构建高质量的 Web 应用程序。
Element Plus 目前已经推出了大量的常用 UI 组件,如按钮、表单、表格、对话框、选项卡等,此外还提供了一些高级组件,如日期选择器、时间选择器、级联选择器、滑块、颜色选择器等。这些组件具有一致的设计和可靠的代码质量,可以为开发者提供稳定的使用体验。官网戳我 。
入门案例 在使用前需要利用 npm install element-plus 命令安装对应依赖。
main.ts 配置如下:
1 2 3 4 5 6 7 8 9 10 import { createApp } from 'vue' import ElementPlus from 'element-plus' import 'element-plus/dist/index.css' import App from './App.vue' createApp (App ).use (ElementPlus ).mount ('#app' )
接下来,在组件文件中,我们只需要去网站上面复制相关源代码即可。较常用的组件包括但不限于:按钮、图标、提示框、导航、标签页、输入框、单选框、复选框、下拉框、日期选择器、表单、对话框、分页、表格……
其他组件库 Ant Designed Vue:https://www.antdv.com/
Naive UI:www.naiveui.com
Apache ECharts Apache ECharts 是一款基于 Javascript 的数据可视化图表库,提供直观,生动,可交互,可个性化定制的数据可视化图表。
官方地址戳我 。
前后端分离总结 初始环境准备 在 src 目录下,asserts 目录是用来存放静态资源的(包括 css 样式,所需要的图片资源等);新建 api 目录用来封装各种请求函数;新建 util 目录用来存放 reqeust.js(配置 axios 的拦截器);新建 views 目录用来存放各种页面。
表单提交 前端经常使用到的就是表单提交,在使用 Element-Plus 组件的前提下,用 el-form 进行表单处理。在使用表单的时候,需要结合接口文档,先声明数据模型。例如,注册页面的所需要的数据模型如下:
1 2 3 4 5 6 const registerData = ref ({ username : '' , password : '' , rePassword : '' })
然后不要忘了根据数据模型中的各种参数,进行表单参数校验 :
1 2 3 4 5 6 7 8 9 10 11 12 13 14 15 16 17 18 19 20 21 22 23 24 25 26 27 const validatePass = (rule, value, callback ) => { if (value === '' ) { callback (new Error ('请再次输入密码' )) } else if (value !== registerData.value .password ) { callback (new Error ('两次密码输入不一致' )) } else { callback () } } const rules = { username : [ {required : true , message : '请输入用户名' , trigger : 'blur' }, {min : 5 , max : 16 , message : '长度为5-16非空字符' , trigger : 'blur' } ], password : [ {required : true , message : '请输入密码' , trigger : 'blur' }, {min : 5 , max : 16 , message : '长度为5-16非空字符' , trigger : 'blur' } ], rePassword : [ {validator : validatePass, trigger : 'blur' } ] }
跨域问题 由于浏览器 的同源策略限制,向不同源(不同协议、不同域名、不同端口)发送 ajax 请求失败。前端服务端口设置在 5173,后端服务端口设置在 8080。当浏览器启动服务时,先向 5173 请求一个注册页面,当我们点击注册按钮时,5173 端口发送 ajax 请求向 8080 请求服务,这个时候对于浏览器来讲就是不同源了。
跨域问题一般使用配置代理 解决。即我们发送请求依旧是向 5173,然后再让 5173 把请求转发到 8080。注意:跨域是针对浏览器而言的,只有浏览器才有同源禁止策略 。
在 reqeust.js 中更改 baseURL 地址:
1 2 3 4 5 6 const instance = axios.create ({ baseURL : '/api' , timeout : 10000 })
然后更改 vite.config.js 文件进行请求转发:
1 2 3 4 5 6 7 8 9 10 11 12 13 14 15 16 17 18 19 20 21 export default defineConfig ({ plugins : [ vue (), ], resolve : { alias : { '@' : fileURLToPath (new URL ('./src' , import .meta .url )) } }, server : { proxy : { '/api' : { target : 'http://localhost:8023' , changeOrigin : true , rewrite : (path ) => path.replace (/^\/api/ , '' ) } } } })
优化 axios 拦截器 我们在实现各种服务接口的时候,我们经常需要去处理响应回来的数据。并且,在发送请求的时候,我们常常需要携带 token。结合上述的跨域问题,我们不妨直接配置一个 axios 拦截器,帮助我们进行数据的处理:
request.js 如下:
1 2 3 4 5 6 7 8 9 10 11 12 13 14 15 16 17 18 19 20 21 22 23 24 25 26 27 28 29 30 31 32 33 34 35 36 37 38 39 40 41 42 43 44 45 46 47 48 49 50 51 52 53 54 55 56 57 58 59 60 61 62 63 64 65 66 67 68 69 70 71 72 73 74 75 76 77 78 79 import axios from 'axios' import { ElMessage } from 'element-plus' import { useTokenStore } from "@/stores/token.js" ;import router from '@/router/router.js' const instance = axios.create ({ baseURL : '/api' , timeout : 10000 }) instance.interceptors .response .use ( response => if (response.config .responseType === 'blob' ) { return response; } if (response.data .code === 0 ) { return response.data } ElMessage ({ message : response.data .message ? response.data .message : '服务异常' , type : 'error' , plain : true , showClose : true }) return Promise .reject (response.data ) }, error => if (error.response .status === 401 ) { ElMessage ({ message : '请先登录' , type : 'error' , plain : true , showClose : true }) router.push ('/login' ) } else { ElMessage ({ message : '服务异常' , type : 'error' , plain : true , showClose : true }) } return Promise .reject (error) } ) instance.interceptors .request .use ( (config ) => { const tokenStore = useTokenStore () if (tokenStore.token ) { config.headers .Authorization = tokenStore.token } return config }, (error ) => { Promise .reject (error) } ) export default instance
需要准备好 pinia 状态管理库,对 token 进行管理:
1 2 3 4 5 6 7 8 9 10 11 12 13 14 15 16 17 18 import { defineStore } from 'pinia' import { computed, ref } from 'vue' export const useTokenStore = defineStore ('token' , ()=> { const token = ref ('' ) const setToken = (newToken ) => { token.value = newToken } const removeToken = ( token.value = '' } return {token, setToken, removeToken} })
服务接口函数只需要接收然后弹出提示即可:
1 2 3 4 5 6 7 8 9 10 11 12 13 14 15 16 const tokenStore = useTokenStore ()const login = async ( let result = await userLoginService (registerData.value ) tokenStore.setToken (result.data ) ElMessage ({ message : result.message ? result.message : '登录成功' , type : 'success' , plain : true , showClose : true }) router.push ('/' ) }
而其他的请求也仅仅只是直接发送即可,没必要再额外向请求头中添加 token 信息了:
1 2 3 4 export const articleCategoryListService = ( return instance.get ('/category' ) }